The Switch Rules
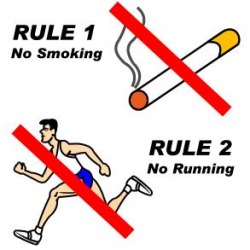
The following is a set of 'rules' that should be followed when working with persons who require to use switches to access their computer, their environment, or to activate a toy or some other piece of equipment. As with all rules, their may be times when they need to be broken, however staff should be able to state the reason they are not adhering; if they cannot state a good reason they should be adhering to the rules! One reason for breaking switch rules may be that the Learner has not worked with switches previously and is learning about them and their function. At this time it may be necessary to hold a switch and 'assist' a Learner to recognise that the switch controls a particular POLE by touching it against the Learner's hand (for example). Thus, during the switch learning period, the rules may be 'manipulated' a little! However, this should be for a short period only.
If you think that there is a rule missing or that something is wrong or requires additional information then don't just sit there! Share it with us all ... contact me at TalkSense using the form at the bottom of this page and, if it meets approval, I'll add your information for all to benefit.
If you think that there is a rule missing or that something is wrong or requires additional information then don't just sit there! Share it with us all ... contact me at TalkSense using the form at the bottom of this page and, if it meets approval, I'll add your information for all to benefit.
Rule One: Maintain the switch position
The first rule concerns maintaining switch position: not just during an individual’s use in any session but across the curriculum for all uses of a switch for the Learner. A switch on the Learner’s left in one session, right in another, mounted in different positions, at different heights makes the likelihood of mastery more remote. Take a photograph of the ideal position and keep it with the Learner so that everyone can see it and ensure that this position is maintained.
A reason for breaking this rule would be during a switch assessment period when a 'best' position is being ascertained. During this period, it will probably be necessary to try varying positions to figure out which is the optimum switch location for a particular Learner. Such a decision is best made by a team of staff including the therapies.
A second reason for breaking this rule is if the Learner changes position during the day; for example, if the Learner is sitting in a wheelchair in one session and using a standing frame in another or laying prone in another. In each case, an assessment should have been made to ascertain the optimum position for the switch.
A third reason for breaking the rule is if the Learner's condition is changing (over time) and it is becoming harder for the Learner to easily access the switch. IN this case, a new switch assessment should be made and a new switch position established.
 |
"Ah ha, at last the perfect position. Now, keep still Smith while I go and find a camera will you?" |
Rule Two: Maintain Switch Style

The second rule concerns maintenance of the switch style for,at least, the use of the same POLE across the curriculum (A POLE is an acronym for a Person, Object, Location, or an Event: that is, the things that a switch can control) Thus, if a round, large, red switch is used for music in one session then, ideally, a large, round, red switch should be used for music in all sessions. Ideally, a Learner will have his/her own switch(es) that travel travel with him/her.
In this instance, the switch will remain consistent throughout the day (the same switch will be used for all access to all POLEs) and therefore it is very important that we remember to apply Rule Three...
Rule Three: Label the Switch
The third rule is to label the switch.
As a Learner, I enter a classroom and I am presented with a switch; I hit it and a dog begins to move. Later in the day, another switch is presented to me in another classroom, it is the same colour, size and shape as the first; however, something different happens to the first time. What have I learnt? Well, if I had a theory that the dog moves when I hit the switch, it is not being reinforced by the actions later that same day. However, the staff member concerned seems happy that I have activated the switch. There is a chance that I may come to learn, when a switch is presented, I am supposed to hit it and then the staff member will smile and maybe praise me. I may not be cognitively engaged with the POLE activity that the switch controls. Indeed in some busy environments it may be difficult to isolate the one thing that the switch is controlling especially if I have a significant learning difficulty. It may be that some music coming from across the room grabs my attention and I form a rudimentary association between the switch and the music. However the switch is not associated with this music.
In order that the Learner can begin to make some sense of his or her world, we need to provide as much (sensory) support as possible, structuring learning and the learning environment in such a way so that it promotes understanding. One of the things we should ensure is that we label switches according to the needs of a particular individual. The label (which may be a symbol or a texture) can be held in place on the switch by the use of a clear plastic switch cap.
You may use your own symbols or you may download the TalkSense SwitchSym set which is completely free of charge for use in educational establishments and for any non-commercial purpose. The downloads are Word documents containing a set of TalkSense's own symbols that cover a range of activities that may be used with a big switch. There are different size downloads for the 'Jelly bean' size of switch. Cut around the dotted line and they fit perfectly under the snap on switch cap. Do NOT laminate the symbols (or, at least make a separate set that are not laminated) as they will then become too thick to sit under a switch cap and tend to force the cap off during use. If a switch cap isn't available however, laminating symbols will make them last longer however you will need to formulate a method of keeping the label in place.
You may also want to link the colour of the switch top with the activity. For example, music (auditory) could always be addressed with a green switch (or whatever colour with which you associate music).
Download big SwitchSyms DOWNLOAD
Download small SwitchSyms DOWNLOAD
Labelling switches
Attach symbols to switches using a clear plastic snap-on or screw-on switch cap. Laminated symbols tend to be too thick to fit underneath the snap on caps easily and may even force them off during use. as such, it is best to use unlaminated symbols.
If such a set of switch symbols is:
- prepared in advance and;
- kept in a clear plastic wallet that is, perhaps, hung on a classroom wall;
- checked and maintained regularly by a nominated staff member to ensure that
there are sufficient switch symbols available;
then, all have easy access and cannot claim they couldn't find a particular symbol or that it was too time consuming to set up.
Ensure that the orientation of the symbol is correct from the Learner's perspective (the Learner is not viewing the symbol upside-down for example) as we want the Learner to begin to associate the symbol with a particular POLE (Person, Object, Location, Event). If the switch is not wireless, the wire should move away from the Learner and the symbol should face in the opposite direction towards the Learner.
Not all switches can be easily labelled of course and, for some, there is literally no point in putting a label on them. For example:
- if the Learner is operating a switch with his/her head s/he won't be able to see the switch and any attached symbol.
- Some switches are too small to be labelled;
in these instances, the symbol could be laminated and positioned such that the Learner is able to see the present function of the switch.
Labelling switches with symbols also serves to associate a particular symbol with a particular POLE activity. Thus, at some point, when the association has been reinforced by long term switch use, the symbol itself could be used by the Learner to request the activity.
Sensory Switch Caps
What do you do about those Learners who have problems with visual acuity and cannot see a symbol? As yet, Sensory Switch Caps or even Sensory Switch Tops are not available from AbleNet. However, it is not outside the bounds of possibility that one day they might market something like this. In the interim, why not make your own?
Extra switch caps can be purchased from your AbleNet vendor, Do not modify the screw on AbleNet switch tops but, rather, the clear plastic snap on caps as this is both easier to do and significantly less expensive. As the caps are clear it is possible to trace out designs through them which makes for some interesting possibilities as described below.
If you are not working with AbleNet switches then there may be other types of switch caps in use. For example, Access Switches from Ability-World have clear screw on switch caps which are prided with the switch at the time of purchase. The idea works as well will any switch cap.
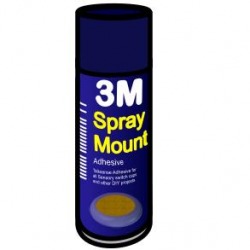
Simple Sensory Switch Caps can be constructed using some spray glue, a piece of circular card cut to fit the shape of the switch cap, and some materials that can be attached with the glue to the top of the cap.
Extra switch caps can be purchased from your AbleNet vendor, Do not modify the screw on AbleNet switch tops but, rather, the clear plastic snap on caps as this is both easier to do and significantly less expensive. As the caps are clear it is possible to trace out designs through them which makes for some interesting possibilities as described below.
If you are not working with AbleNet switches then there may be other types of switch caps in use. For example, Access Switches from Ability-World have clear screw on switch caps which are prided with the switch at the time of purchase. The idea works as well will any switch cap.
Simple Sensory Switch Caps can be constructed using some spray glue, a piece of circular card cut to fit the shape of the switch cap, and some materials that can be attached with the glue to the top of the cap.
- Take the card and create a template by piercing and cutting a circular hole
approximately 15mm in form the outer edge;.
- Place the card template on top of the switch cap on top of some old newspaper;
- Using the spray mount glue, spray a film of glue onto the switch cap through
the template;
- This will create a circular film of glue on the surface of the switch cap;
- Now attach a substance to the glue. For example, you could sprinkle dry sand
over the surface;
- Allow to dry and shake off the excess.
You now have created a Sensory Switch Cap. It is better practice to have sets of caps for individual Learners rather than share then amongst a group.
Having created a sandy Sensory Switch Cap, we now must associate it with a POLE (Person, Object, Location, Event) by using it only in conjunction with that particular activity. For example, the sandy cap could be used every time the Learner is engage in something to do with music. There is no connection between music and sand (apart from the musical - the Sand of Music!)(Sorry!); we make the connection by using it consistently every time the POLE features music. To this end, Sensory Switch Caps must be made for switch use as well and, therefore, if we are using Big Reds and Jelly Beans, two sizes of switch caps need to be adapted.
Once adapted, stick a label on the inside/underside of the cap, which won't be seen during use, that will serve to identify its POLE link (music) and the owner of the cap(so it can be returned to rightful Learner should it be misplaced) to all staff who may need to use it from time to time.
Do not be tempted to create thousands of such caps: start simply with just a few. Below are some ideas for the POLE and the surface:
POLE SUBSTANCE
Music Sand, raised musical note
Greeting Felt circle (the looped side of Velcro is also good)
Water/bubbles Sponge (could even be made to be slightly damp) (use a blue BIGmack?)
Toy (animal) Fur
Toy (vehicle) Wheel
Light source Raised star shape (use a yellow switch?)
Vibration Stick-on feet (Maplins sell such things) to create domed bumpy surface
Don't like those ideas? No problem, they are just ideas - you are free to use anything. However, please remember, whatever you use, it should be used consistently across the curriculum for a particular POLE otherwise both Learners and staff can become very confused!
Here are possible other everyday and inexpensive substances that could be attached to represent other POLEs: coins, rice, fishnet, matchsticks (spent), keys, paper-clips, chain, string, tin foil, washers, dried peas, sections of plastic straws, plastic scouring pads. Some of these will require stronger glue. Where the substance may require washing, it can be attached by waterproof adhesive. If Objects Of Reference are being used with a particular Learner or Learners, it is important to liaise with the staff concerned with the management of the scheme such that conflicts are not created. Objects Of Reference should NOT be used as sensory switch caps.
If you have other good ideas in this area, why not contact me so that I can add them into the site? CONTACT
There is another method of making sensory switch caps which involves ...
Raised Surface Sensory Switch Caps
Hot glue is a relatively easy way of creating a raised line on top of a switch cap. As the switch cap is clear, a design can be placed underneath and then traced with the hot glue gun leaving a raised surface line that adheres to the cap. This design can be felt by the Learner in interactions with the switch.
If you don't want to use hot glue then silicon sealer comes in tubes that can be placed into a dispenser (available from DIY stores). The silicon will set to provide a continuous raised line on the surface of the cap.
If desirable, you can combine both the above ideas, infilling the area enclosed by the raised line with a sensory surface. For example, one could create a simple musical note shape outline and fill the inner surface with sand.
New raised line designs need to be as distinct from other patterns previously created as possible to raise the potential of Learner cognisance. Again, do not be tempted to create hundreds of such items: start simply and consult as may others as possible on your ideas for designs for links to POLE items.
Associating symbol/sensory surface with POLE
POLE stands for Person, Object, Location, Event. Typically a switch will activate an item that relates to one of these areas. Saying 'hello' for example relates to both Person and to an Event.
While some may argue that the link between the sensory surface and the POLE must be concrete, my experience shows that it need not necessarily have a direct link (sand and music?) as long as it is used consistently over a period of time such that an association is formed in the Learner's mind. Of course, if there is an obvious choice for a sensory surface
that relates directly to the POLE then it would be foolhardy not to use it. However, failing
such an obvious solution ... it is not wrong to create your own! Consistency of approach in such circumstances in of great importance.
Research into the development of memory consistently shows that repetitions and rehearsals of an action help to form long term memories. For example, Huppert and Piercy showed that an increase in the number of times an item is presented at study enhances recall and recognition in individuals with amnesia (see also Strauss et al 1985 and Weingartner et al 1993). Therefore, to make any memory impression lasting and enduring, it is necessary to review it frequently, going over it again and again, until it is firmly fixed. As such, the more we can promote repetitions of interactions with sensory surfaces on switch caps,the greater the likelihood that the Learner will begin to form an association between the surface and the POLE. Thus, the POLE should not be longer that 15 seconds in duration (10 seconds is more than enough) and be motivational enough to prompt repeated activations.
At some later point, when such associative bonds have been formed, they can be utilised to promote awareness, anticipation and the development of communication skills.
Rule Four: Avoid Teaching Fly-swatting
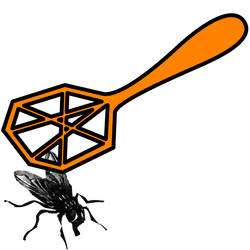
I have witnessed staff members passing a (wireless) switch around a group of Learners. This is not best practice! Why is it not best practice?
1. While one Learner is active the others are sitting and waiting and are not necessarily on task. Too much Learner time is spent waiting during such activities.
2. There is a real danger of 'Fly-Swatting': that is, the Learner simply learns to hit a presented switch without any cognitive engagement with what the switch is doing. Fly Swatting is a learned behaviour (stimulus response) - 'when a switch is presented I have to touch it'. Be aware that a Learner may therefore be able to activate a switch but have no real understanding of the POLE that the switch is controlling.
3. One switch may not be suitable for all Learners. Some may require a different type of switch positioned correctly to enable Learner access.
4. Staff may be activating a switch for the Learner by moving and pressing the switch against the Learner's hand (or other body part).
Staff tend to reinforce a positive interaction with a switch with smiles and praise (and moving on to another person!). For some, this may be reward enough and there may be no cognitive engagement with the POLE itself. Responding to a presented stimulus (the switch) in this way without cognitive engagement with the POLE is termed 'fly-swatting'. Fly-swatting is undesirable although while learning about switches all Learners must pass through a fly-swatting phase.
To learn more about cognitive engagement and fly-swatting go to the 'Creating Active eNvironments (CAN) page by clicking HERE.
Rule Five: Focus on the POLE
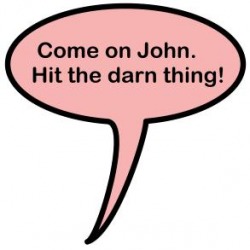
The fifth rule concerns itself with the focus of communication aout the activity from staff to Learner. As the switch is being used as the interface to a Person, Object, Location or Event (POLE: for example turning on a toy) then the focus should be on the POLE rather than on the switch itself. Thus, staff should not prompt by saying 'Come on Johnny, hit the switch' but rather:
'turn on the fan'
or
'play the music'
or perhaps ask
'What do you want to do?',
where a BIGmack provides an answer.
Cueing/prompting a Learner in this way may turn the Learner's focus away from the task in hand. This, in itself could be problematic ...
'turn on the fan'
or
'play the music'
or perhaps ask
'What do you want to do?',
where a BIGmack provides an answer.
Cueing/prompting a Learner in this way may turn the Learner's focus away from the task in hand. This, in itself could be problematic ...
Rule Six: Mount the switch
The sixth rule states that whenever possible switches should be mounted and not held.
Holding the switch could lead to unintentional Learner assistance. Sometimes this is a desirable feature: for example, when helping an individual to understand that a switch controls an aspect of the environment during a learning phase. However, especially when assessing ability, and once the learning phase is over, it is important that switches are mounted rather than held.
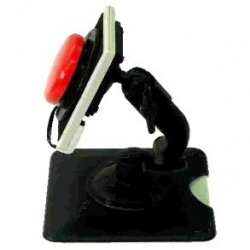
An easy to use and very versatile set of mounts are the Sensitrac range available from Ability-World in the UK and XXXX in the USA. The mounts typically feature a quick release suction base such that, when place on any smooth flat surface, they adhere like glue but can be released, as if by magic, very easily, to be re-positioned.
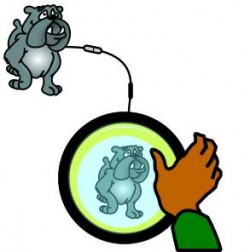
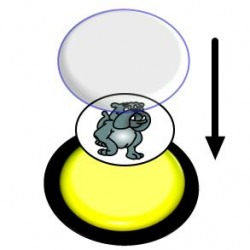
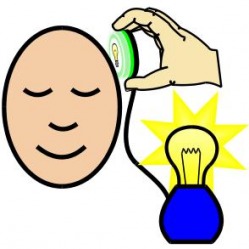
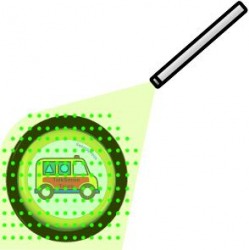
Rule Seven: POLE should be proximal in space and time
The seventh rule states that switch and POLE should be proximal in space and in time.
When activating a switch, the Learner needs to associate it with its POLE and, therefore, if the POLE is distal, there is less chance of that association being made. For example, if the TV is across the other side of the room and the Learner's (wireless) switch is set to turn it off and on, the Learner may not make the connection between something happening in the distance and his/her action on the switch.
If a switch is connected to an electric kettle for example (not recommended for safety reasons) – the kettle does not begin to boil for some time – the Learner would not make the connection between the original activation and the boiling kettle. The same would be true of an electric iron or a toaster; these things do not start to perform immeadiately and therefore (appart from safety issues) should be avoided.
The image shows a switch attached by a very long cable to a toy dog some way in the distance. Even if the Learner could see the dog, s/he is unlikely to form any connection (cause and effect) at such a distance.
Rule eight: Remove when not in use
The eighth rule recommends that switches are removed when not being used or when disconnected. There is little point in trying to establish cause and effect if a switch is left for a Learner to access when the switch does not perform some action. If a switch is disconnected then it should be removed. Furthermore, the switch should also be removed if staff cannot provide the POLE event (for example, if the Learner's switch action is asking for a walk in the garden). The Learner who continually requests a POLE and is ignored by staff (who may be otherwise engaged) will not learn cause and effect skills. There will be times when staff have too many other things to do to provide the POLE event or when there aren't enough staff as several are out of the room on other duties. IN such circumstances, remove the switch and redirect the Learner's focus to other tasks. It is really important that staff only provide switch access when the POLE is available, connected and functioning.
Rule Nine: Provide sufficient response time
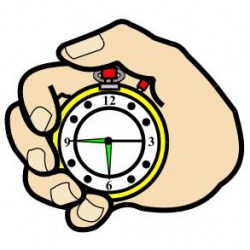
The ninth rule is that it is important Facilitators provide a sufficient response time.
Facilitators should not interrupt by filling in any lapse in time with additional language (comments and commands) which will (tend to) confuse the Learner. ‘Prompting’ or ‘cuing’ should be kept to an absolute minimum. When a Learner engages with a task s/he has to:
- listen to the instructions;
- understand what is required;
- figure out how to respond;
- engage muscles;
- focus on and perform the action.
This is unlikely to happen instantaneously. If in that time, a staff member interrupts with a helpful comment, a prompt, or a cue – where does the Learner’s focus now reside? On the task or with the staff? If the above series is broken the Learner will likely have to start over. Prompting then is not always helpful! Any prompt is a distraction and may divert the Learner’s focus from the task. How is it possible to know that a Learner has engaged with a task? What if he simply hasn’t engaged at all and is just sitting there? What if the Learner is stuck at the figuring out how to respond stage and needs help? All these are potential pitfalls. However, if the staff member leaves a sufficient response time before taking any action then this is better practice than interrupting too soon. In providing prompts, cues, encouraging remarks etc … there is a hierarchical approach that should be adopted where ‘less is more’. The prompting hierarchy (Musselwhite 2009 adapted by Jones) is as follows:
- Pause at least 10 seconds;
- Use a light pen (fine beam torch) to indicate the general area in which the Learner should focus;
- Use a light pen to narrow the focus;
- Use a light pen to indicate the solution (switch);
- Provide a short verbal cue;
- Use a visual cue (perhaps show the Learner a symbol for the POLE);
- Use distal physical prompting (touch shoulder of arm Learner is to use);
- Use hand UNDER hand prompting;
- Hand over hand obscures the Learner’s hand and the target;
- Learner will tend to focus on staff’s hand and not on the target;
- Don’t touch soft flesh or muscle but rather select bony areas such as the wrist (work from distal to proximal (to the POLE):
shoulder, elbow, wrist.
Prompting hierarchies and techniques
In rule five above, it was suggested that any verbal prompt should focus on the POLE and not on the switch or the BIGmack. While this is considered good practice it should not always be the primary method of prompting or cuing a Learner. If the Learner has been (t)asked to do something that is controlled through a switch, a number of things have to happen. The Learner has to:
- attend to the request;
- listen to the words in the request and try and make sense of what is being asked;
- figure out a respond to the request;
- send commands to the muscles in his/her body to perform and action ...
For some Learners this may take a little time. If in that period of time, when the Learner is focused on the task, a staff member begins to speak to the Learner, where is the Learner focus moved? It is moved from the task and on to the staff member! The Learner is is now engaged in making sense of a new command! Therefore, we should NOT interrupt a Learner who is focused on a task once the original request has been made unless we believe that the Learner has lost focus. Hence, a period of (at least) ten seconds should be allowed before any prompt is given. Many Learners require even more 'thinking time'.
When prompts are delivered, they should begin with the least invasive or intrusive (unless there is a reason to begin with the most invasive or intrusive). That means we should begin with a prompt that is specifically designed not take the Learner focus away from the task in hand but, rather, draw specific attention back to it. Such an Increasing Hierarchy prompting mechanism might begin with the staff's use of a laser pen (for Learners who have no problem with vision) moving the point of light around the general area of the BIGmack or switch. Laser pens are ideal for this purpose and are readily available cheaply over the internet from such stockists as Amazon for example. Some laser pens even can be set to provide a spread of multiple points of coloured light to highlight a surface area. If a Learner would have a problem with seeing the laser light(s) then another sensory area must be considered. What is going to be the least intrusive for this Learner that will prompt to interaction with the switch. Perhaps some form of clicker device could be used from the proximal area of the switch.
Increasing & Decreasing Prompt Hierarchies

Prompting is a method of helping Learners in acquiring a skill. Prompts should only be used when necessary and, then, only for a period that is sufficient to assist the Learner. There should always be a plan to phase out all prompts over a period of time otherwise the Learner may become prompt dependent which is yet another feature of passivity. Prompts should only be used after (at the very minimum) a delay of ten seconds to allow the Learner time to process the initial staff request, form and act upon a response.
An increasing prompt hierarchy is primarily used where a Learner has already learned the basic skills involved in the task. It involves Learner cues that become increasingly more invasive with time until perhaps, finally, the facilitator uses hand-under-hand techniques (see below) to guide the Learner to the desired action.
A decreasing prompt hierarchy is primarily used where a Learner has not yet been taught the basic skils involved in the requred task. Thus, it might begin with the most invasive
technique and plan to fade all cues and prompt over time.
Hand-Under-Hand technique

When working with a dog, it is generally known that it is of no use pointing to something to which you want to draw the animal's attention. The dog does not understand the conventions involved and will typically attend to the pointing hand itself rather than at the thing to which the hand is pointing. People experiencing learning difficulties also may not understand such conventions and, if a hand is used to assist their learning, may attend to the Facilitator's hand and not to the task.
Thus, it is important to make the use of a Facilitator's hand in assisting a Learner's movement as non-invasive and non-intrusive as possible. When performing such actions it is considered best practice to:
- ensure that the Learner is aware that you intend to assist them by
moving into their personal space and touching them;
- work with bony structures such as the wrist, elbow, shoulder rather than flesh
or muscle which can be more painful;
- work hand under hand: that is, support the Learner's wrist (for example) from underneath NOT from above
as is typical in interactions of this type.
When working hand under hand in this manner, the Learner is not focusing on the facilitator's hand and will not find it painful. The Learner can be 'facilitated' to promote success with early switch interactions.
Rule Ten: Maintain your goals

The tenth rule is ‘maintain your goals’. It is likely that other therapists (especially Occupational and Physio) will make requests that switches are adjusted to suit some alternative therapy goal – for example, to aid muscle control. This should be resisted! Do NOT take on board another’s goals when working with switches – your role is to promote access (ease of access) so that the Learner has the greatest chance to understand that the switch is causing the effect and the greatest chance of success. If the switch is raised slightly or re-positioned to suit another’s goals then it can reduce the likelihood that you will achieve your stated goals. Resist such demands! Just say NO. That is NOT to say that these therapy ‘goals’ are not important, they are. However, they should be addressed at other times and through other means than the use of switches.
Rule Eleven: Safety first
The final rule (but not the least) concerns the safety of the Learner.
Switches should not be directly connected to dangerous objects that would expose the Learner to harm (boiling water, fast moving machinery, heated surfaces, heavy objects that could be pulled onto the Learner by pulling on the switch cable). While it is appreciated that Learners should experience boiling a kettle to make a drink for example, there are measures that should always be observed to ensure Learner safety: remote switches can be used, the Learner should not be left unattended, and the Learner should be a safe distance from the boiling kettle … (risk analysis methodologies should be used to minimize the risk).
Switches should not be directly connected to dangerous objects that would expose the Learner to harm (boiling water, fast moving machinery, heated surfaces, heavy objects that could be pulled onto the Learner by pulling on the switch cable). While it is appreciated that Learners should experience boiling a kettle to make a drink for example, there are measures that should always be observed to ensure Learner safety: remote switches can be used, the Learner should not be left unattended, and the Learner should be a safe distance from the boiling kettle … (risk analysis methodologies should be used to minimize the risk).
More info ...
Switches need not be hand operated: other parts of the body can be more effective for some people.
Switches need not be flat mounted: they can be positioned at any angle. In some cases, it is better to mount the switch upside-down just above the Learner’s hand. Learners, in raising their hands only a fraction, activate the switch and, instead of having to attempt to remove their hand from the switch, gravity takes their hand away, down to its resting place ready for the next activation. Mounting switches easily and swiftly can be achieved with the Sensitrac range of products.
Switch labels can be protected with switch caps. Some switches come complete with switch caps (the Access Switch for example), some require that switch caps are purchased separately.
Switches can be ‘coated’ on the base with Ultra-Mate Velcro. The hooks side should be used. The hooks will then attach to any loop (soft side) Velcro (as on the Sensitrac range of slider plates) or to most carpet tiles or pieces of carpet (Carpet could be cut to match the shape of a Learner’s wheelchair tray so that a switch or switches can be positioned anywhere with ease). Ultra Mate Velcro is extremely strong – probably the strongest on the market for the size of hooks and loops. UltraMate can be puchased from Liberator ltd.
Switches can also be mounted with UltraStick. This is a thin film of jelly like material that is very tough and sticky. This is positioned between the switch and the surface and holds firm even to vertical surfaces! The switch can be removed and the UltraStick can be reused. If the ultra-Stick gets dirty it loses its adhesiveness. However, a quick wash with soap and warm water and it is like new once again.
RJ Cooper markets an excellent alternate product called ‘stick and suck’. Stick and suck is a thin (about the thickness of double side picture mounting tape) disk. On one side is a permanent self-adhesive. The other side consists of thousands of very small suction cups so small that you are unable to see them. They are sold as sheets. Each sheet consists of two 2 1/4" disks and one 3 1/4" disk. The smaller ones can be used for Medium Access switches, Buddy Buttons, Jelly Bean and similar switches, and the larger ones for the Big Reds, Big Buddy Buttons, Big Macs etc. Once in a while, it will be necessary to clean the suction pads by sticking and then peeling wide cellophane packing tape to/from its surface. R.J. Coopers agent in the UK is Liberator Ltd.
Wobble switches
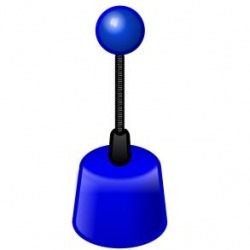
Wobble Switches are ideal switches to try when other switches don’t meet the need. These are spring mounted with a small ball at the end (see picture). Hitting anywhere on the surface of the spring ball arm causes it to bend and, in turn, activates the switch. Thus, the arm can follow through on the move, the spring bending out of the way. They will work in any direction and are as easily mounted as the other switch types that have been illustrated. Furthermore, the spring can be extended using ordinary pipe insulation that can be purchased from any DIY store. This slides over the ball on top of the spring as if it were made for the job! Thus, the spring is extended and the lagging can be cut to the ideal length. Wobble switches can easily be operated with the head, hand, foot or, indeed, any suitable part of the body.
Remote Control by switches

Excitim’s ‘Domino’ is a simple infra-red environmental controller allowing from one to six switches to control any one of four items or aspect of an item within the environment. The device can be controlled from the buttons on the surface or from switches that plug into sockets on the side of the system (switches are not supplied with the Domino). The yellow buttons swap between one of four systems (TV, hifi, curtains, door etc) and the white buttons control the functions of the selected system (volume up, volume down, change channel, on, off, etc). The Domino 'learns' the codes from the remote control handsets to the chosen systems. For example, it can 'learn' the codes from the tv remote control. The instructions for the device are printed on the underneath of the Domino.
The Domino allows any device that has its own infrq-red remote control handset to be controlled by switches. You don't need to use all six functions: a Learner could start with just one (for example, chnanging the channel on the TV) with one switch and then move to a second switch when the first has been mastered.
The Domino allows any device that has its own infrq-red remote control handset to be controlled by switches. You don't need to use all six functions: a Learner could start with just one (for example, chnanging the channel on the TV) with one switch and then move to a second switch when the first has been mastered.
Contact TalkSense
 Return To Switch Skills |
 |
